How can we help you?
Here in our Help Center you will find all general answers to questions about billing, admin panel, product and much more.
This guide will walk you through the process of importing users into the employee app system in detail using an Excel file.
01. Preparation: user groups and profile fields
Before you start the import, user groups and profile fields must be configured in the system. This is critical to ensure all data is correctly mapped.
Steps:
- Login in the admin panel: Log in with your credentials.
- Configuration of user groups: Create the user groups you need.
- Configuration of profile fields: Set up all necessary profile fields.
- Verification: Make sure everything is set up correctly before proceeding.
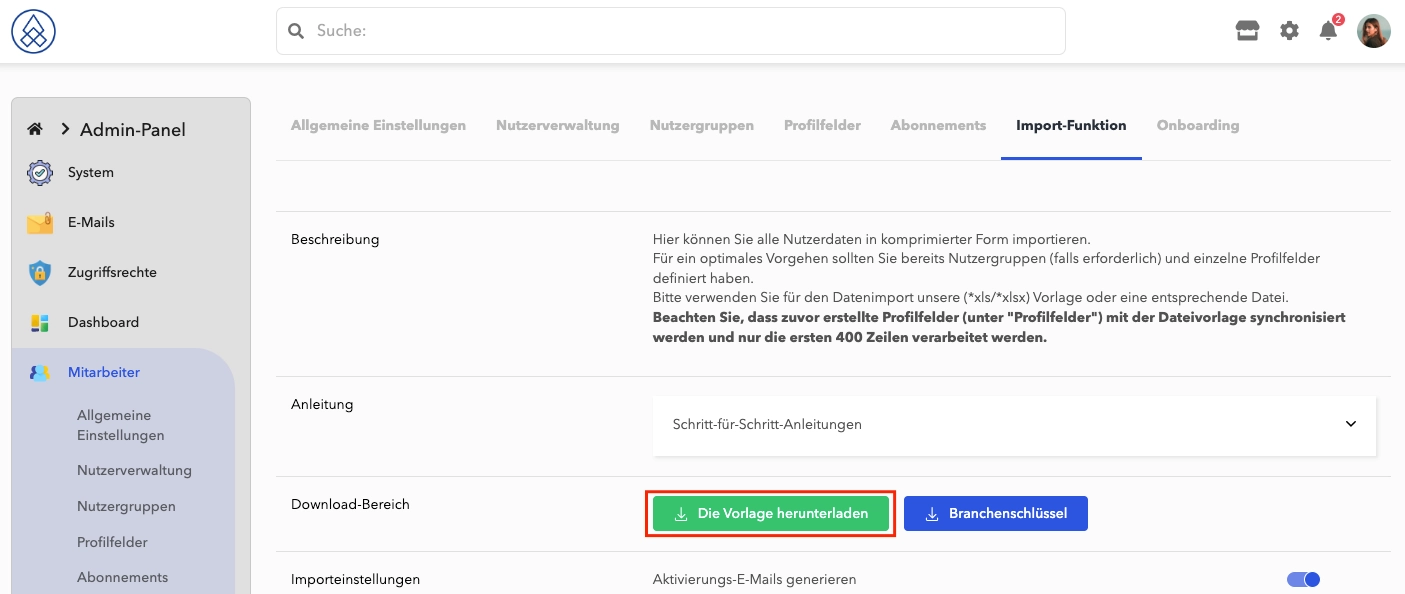
02. Download template file
Downloading the template file is the first step in the import process.
Steps:
- Navigate to the download area: In the admin panel you will find the button "Download the template" .
- Start Download: Click the button and the file will start downloading automatically.
- Save the file: Save the file to a safe place on your computer.
03. Fill in the template file
Carefully fill out the Excel template file by filling in the following fields for each user. Note the specific requirements and instructions for each field:
- Email: Enter the user's email address to which notifications should be sent.
- User group: Enter the user group(s) to which the user belongs. You can separate multiple user groups with commas. It is important to use exactly the same spelling as stored in the admin panel.
- Gender: Assign gender according to requirements:
- 1 stands for male
- 2 stands for female
- 3 stands for Miscellaneous (The email salutation is used as "Hello")
- Academic Title: If available, provide the user's academic title. The available options are "Dr.", "Prof." or "Prof. Dr.".
- First name: Enter the first name of the user.
- Last name: Enter the last name of the user.
- Birthday: Enter the user's date of birth in the format DD.MM.YYYY.
To help, administrators can use the following formula to convert deviating date formats into the correct target format DD.MM.YYYY. The requirement for this formula is that the field is formatted as a text field. We ask for your understanding that we cannot provide any support for Excel formulas:
=TEXT(DATUM(WENN(LÄNGE(RECHTS(WECHSELN(WECHSELN(WECHSELN(A1;"/";".");"-";".");".";);2))=2;2000+RECHTS(WECHSELN(WECHSELN(WECHSELN(A1;"/";".");"-";".");".";);2);RECHTS(WECHSELN(WECHSELN(WECHSELN(A1;"/";".");"-";".");".";);4));LINKS(WECHSELN(WECHSELN(A1;"/";".");"-";".");FINDEN(".";WECHSELN(WECHSELN(A1;"/";".");"-";"."))-1);TEIL(WECHSELN(WECHSELN(A1;"/";".");"-";".");FINDEN(".";WECHSELN(WECHSELN(A1;"/";".");"-";"."))+1;2));"TT.MM.JJJJ")
- Deceased on: If an ancestor profile is desired, the date of death can be given.
- Country: Simple indication of the country in which the user lives, such as "Germany" or "Austria".
- City: Enter the city or location, such as "Hamburg" or "Main-Taunus-Kreis".
- Street: Enter the street without the house number.
To help, admins can use the following formula to extract the street name without the house number. We ask for your understanding that we cannot provide any support for Excel formulas:
=LINKS(A1;LÄNGE(A1)-LÄNGE(RECHTS(A1;LÄNGE(A1)-SUCHEN(" ";A1;LÄNGE(A1)-5))))
- House number: Enter the house number without the street.
To help, admins can use the following formula to extract the house number without the street. We ask for your understanding that we cannot provide any support for Excel formulas:
=RECHTS(A1;LÄNGE(A1)-SUCHEN(" ";A1;LÄNGE(A1)-5))
- Zip code: Enter the user's zip code.
- Telephone number: The telephone number must be given in the format 49 221 123456, separated by country code, area code and phone number, without special characters.
To help, administrators can use the following formula to convert phone numbers in various formats into the correct target form 49 123 45679. We ask for your understanding that we cannot provide any support for Excel formulas:
=WENN(LÄNGE(WECHSELN(WECHSELN(WECHSELN(WECHSELN(WECHSELN(WECHSELN(WECHSELN(WECHSELN(A1;" ";"");"-";"");"/";"");"(0)";"");"(+49)";"");"(49)";"");"+";"");"(0)";""))<>11;"Falsches Format"; "49 " & TEIL(WECHSELN(WECHSELN(WECHSELN(WECHSELN(WECHSELN(WECHSELN(WECHSELN(WECHSELN(A1;" ";"");"-";"");"/";"");"(0)";"");"(+49)";"");"(49)";"");"+";"");"(0)";"");2;3) & " " & TEIL(WECHSELN(WECHSELN(WECHSELN(WECHSELN(WECHSELN(WECHSELN(WECHSELN(WECHSELN(A1;" ";"");"-";"");"/";"");"(0)";"");"(+49)";"");"(49)";"");"+";"");"(0)";"");5;6))
- LinkedIn profile: If available, enter the URL to the user's LinkedIn profile.
- Industry: Indicate the industry in which the person works. The branch key can be downloaded from the admin panel.
- Company: Provide the name of the company where the user works.
- Position: Enter the user's position in the company.
Extreme care must be taken when filling in these fields as they are crucial for the correct identification and attribution of users within the system. Incorrect entries can lead to problems with the import process.
Important instructions:
- The date format is DD.MM.YYYY.
- The phone number format is 49 221 123456.
- The limit per upload is 400 users.
Once you have entered all the required information, save the file and proceed to the next step of the import process.
Example of a valid import file.
To ensure successful address importation, all four columns—Country, City, Street, and House Number—must be filled with valid values that can be processed by Google Maps. During the import process, a validation check is performed to confirm the existence of the address in service. If the address is not found, none of these fields will be imported, and the user's address will be empty.
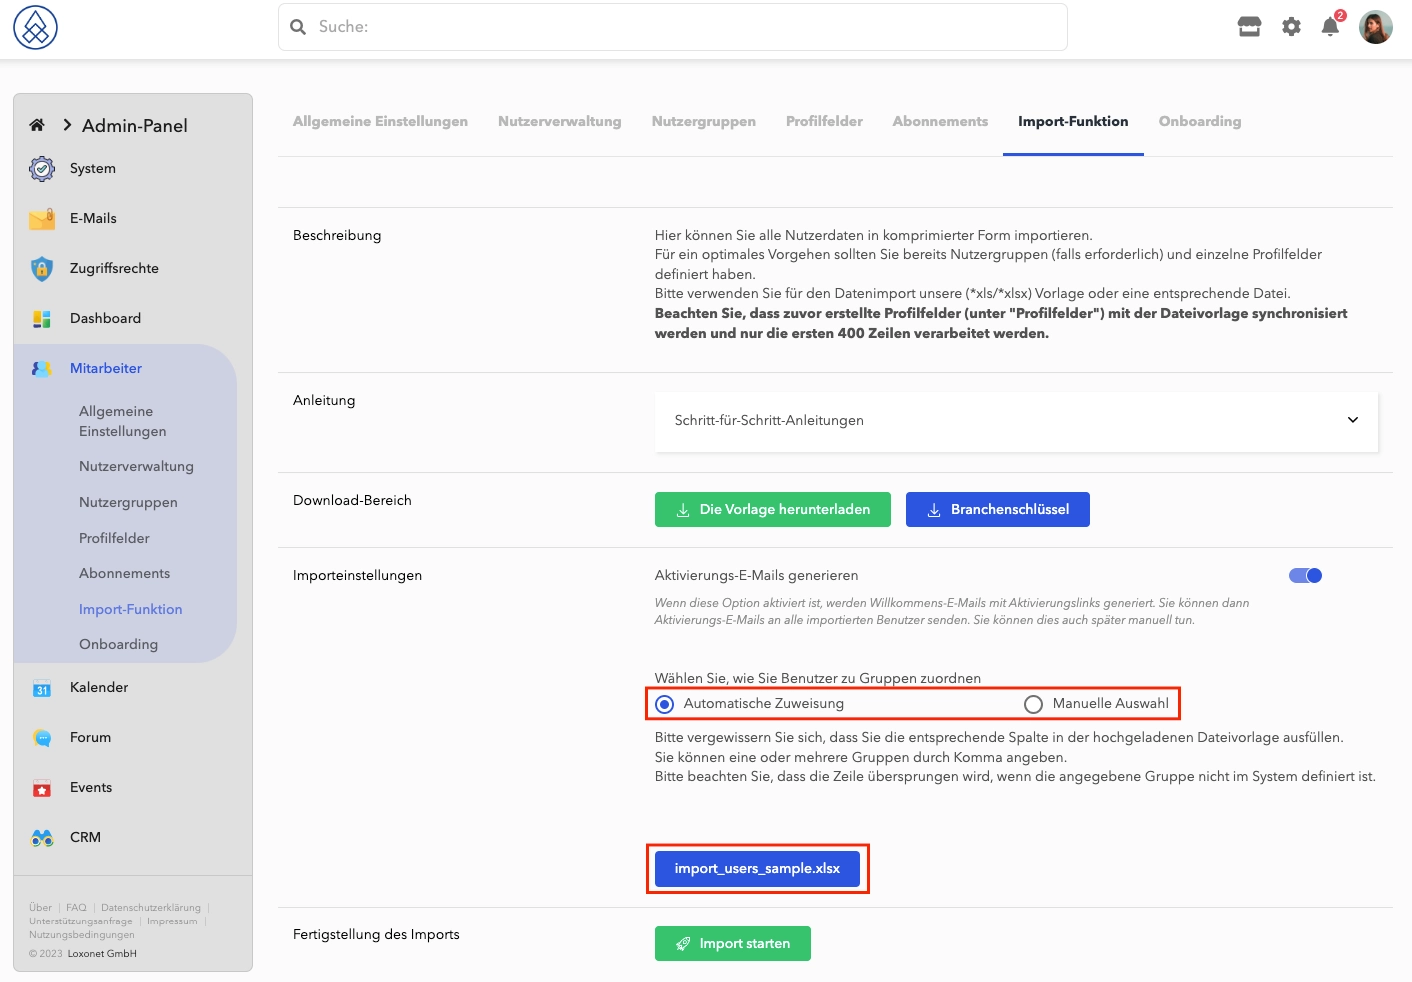
04. Upload the file
Now that the template file is filled out, you can proceed with the upload.
Steps:
- Select file: In the admin panel select the file from your computer.
- User group assignment: Decide whether you want automatic or manual assignment.
- Confirm Upload: Click "Upload" and wait for confirmation.
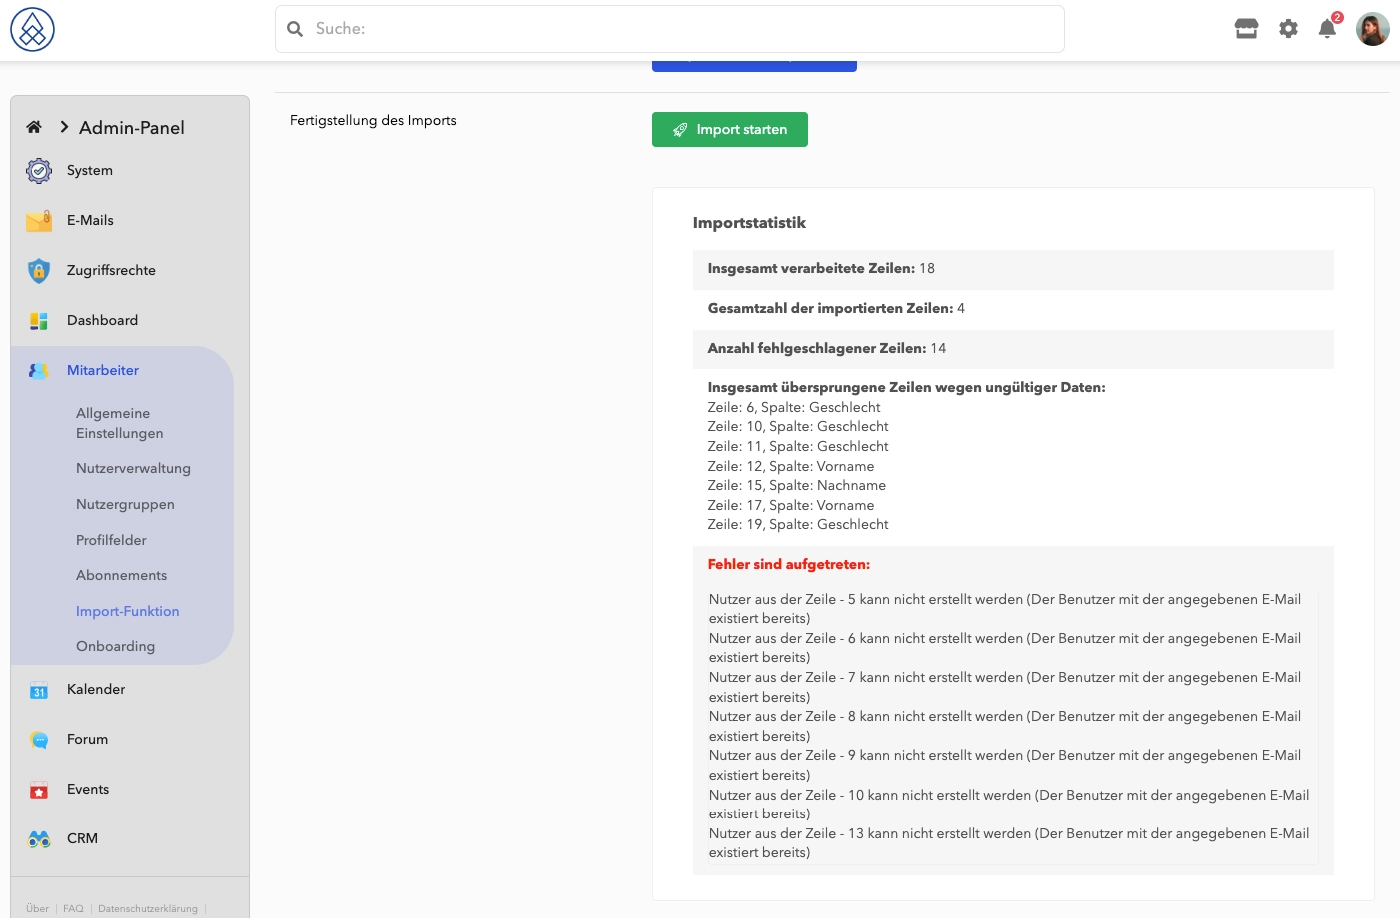
After uploading new users, you have the opportunity to check whether there were any errors processing the users.
Example of an error-free import.

Example of an import with errors.
In the import statistics window you can find out about the problems and errors that occurred during the import.
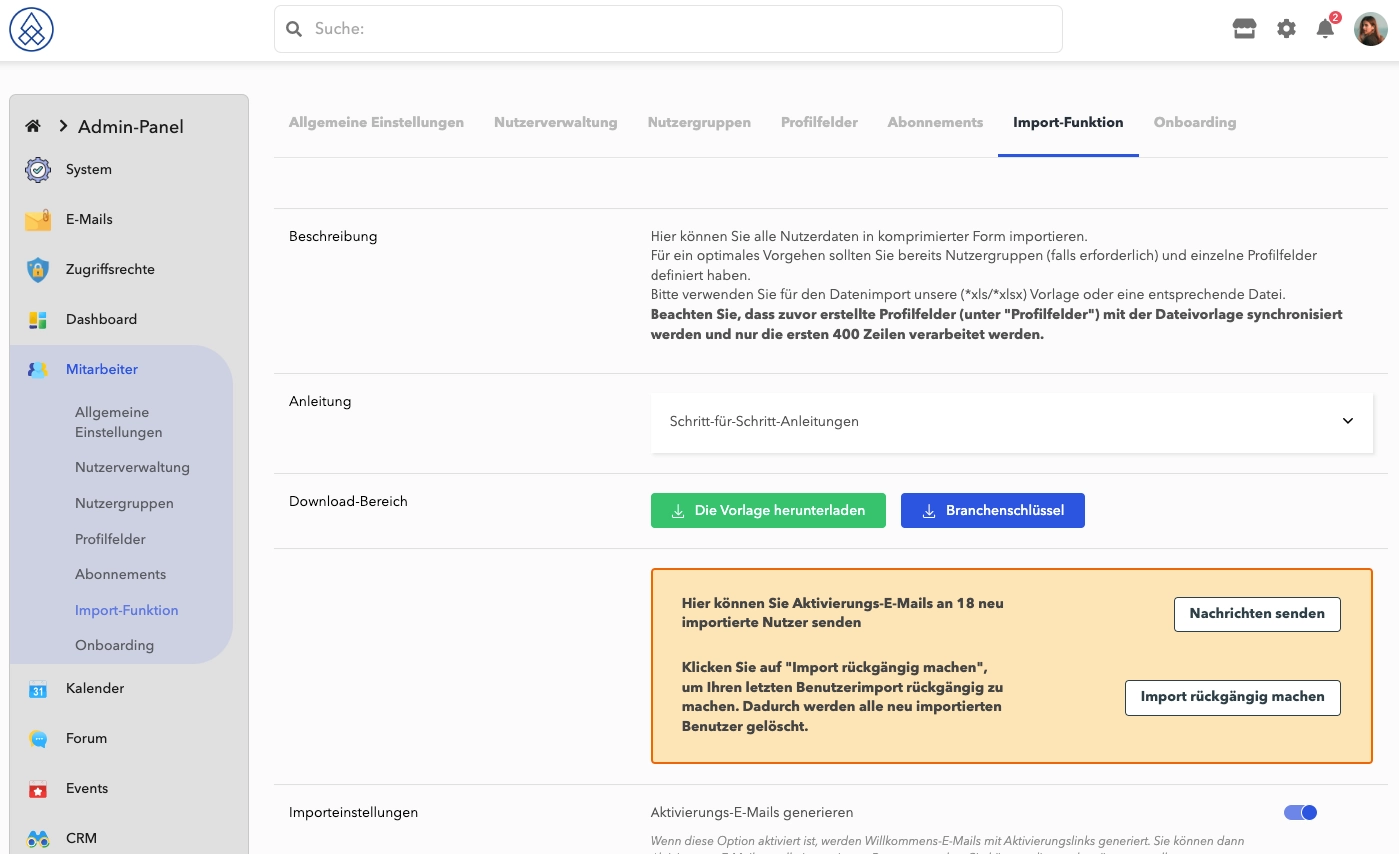
Before sending activation emails or confirming the import, you have the option to cancel the import, make corrections to the import file, and try again.
05. Further processing of users
After the upload, the data must be processed.
Steps:
- Sample verification: Check some users to make sure everything is fine.
- Choose the action you want: You have three options:
- Complete the import successfully: transfer without activation email.
- Send activation email: With the sending of the activation email.
- Reset import: Delete the imported users if required.
- Complete the process: Follow the on-screen prompts to complete the process.
Diploma
Your user import is now complete. You can edit and manage the users as active users. If you have any needs or questions, please contact our support team who will be happy to help you.